Showing posts with label Avaya. Show all posts

Demystifying Your Call Data: Introducing SMDR Lite

Normally I post stuff on this blog about software that someone else has written, but that changes today. I have often been frustrated by the lack of a built-in tool for producing CDR with IP Office. My frustrations peaked a couple months ago, so I wrote some tools to solve this issue. The first of these tools is a simple command-line utility that can pull SMDR data from the IP Office on an ad-hoc basis. This is perfect for pulling records when the client does not need regular CDR information. I have called this tool SMDR Lite. 

The Crucial Need for SMDR

Why bother collecting call records? SMDR data is the foundation of Call Accounting. By analyzing these records, companies can:

  1. Control Costs: Accurately track external call charges and allocate costs back to specific departments or projects.

  2. Monitor Usage: Identify peak usage times, understand trunk utilization, and plan capacity upgrades effectively.

  3. Ensure Compliance & Security: Review call logs for unauthorized usage or potential security breaches, such as toll fraud.

  4. Improve Efficiency: Analyze answer times, hold times, and missed calls to optimize staff scheduling and customer service.

How Avaya Generates SMDR Records

The Avaya IP Office doesn't just store SMDR data locally; it's designed to stream it out in a continuous, delimited format.

Each record is a single line of text containing a detailed snapshot of a call event. While Avaya includes many fields, some key pieces of information captured are:

  • Call Start Time

  • Duration (Connected Time/Ring Time)

  • Caller & Called Number

  • Direction (Inbound/Outbound)

  • Internal Device Names (e.g., extensions, groups)

  • Hold Time & Park Time

Crucially, the IP Office acts as a Client in this process. Once configured, it will actively push this stream of text data to a designated network address and port.

The Collection Mechanism: SMDR Lite as a Simple Listener

Collecting the SMDR stream requires a Server—a program that listens for the incoming connection and data. This is where SMDR Lite comes in.

SMDR Lite uses the TCP protocol to open a listening port on your Windows PC. It's designed specifically for environments where a full, complex call accounting server is overkill.

  • Non-Privileged Access: SMDR Lite defaults to port 5000. Because this is above the privileged port threshold (1024), it does not require administrative rights to run, making deployment simple and secure.

  • Real-Time Appending: As soon as a complete call record is received from the Avaya system, SMDR Lite instantly appends it as a new row to your designated CSV file.

  • Live Status: The application displays a live count of records received and the time of the last record, giving you immediate feedback that the connection is working.

Getting Started with SMDR Lite

SMDR Lite is distributed as a single, standalone executable file: smdr.exe. No Python or extra libraries are required on the target machine.

1. Running the Executable

You run the tool via the Windows Command Prompt or PowerShell:

Action

Command

Result

Default Run

smdr.exe

Listens on Port 5000, writes to smdr.csv

Change Port

smdr.exe --port 9000

Listens on the specified Port 9000

Custom Filename

smdr.exe --filename office_data.csv

Writes to office_data.csv

To exit the application gracefully at any time, simply press the Q key on your keyboard.

2. Configuring the Avaya IP Office

The final step is telling your Avaya system where to send the data:

  1. Open IP Office Manager and navigate to the System settings.

  2. Select the SMDR tab.

  3. Set the Output to SMDR Only.

  4. In the IP Address field, enter the IP address of the Windows PC running smdr.exe.

  5. In the TCP Port field, enter the port number (5000 by default) that you specified when running smdr.exe.

Save and merge the configuration, and your SMDR Lite tool will immediately begin populating your CSV file with valuable call data!

Avaya SBCE Network Interface issues

 I was tasked with configuring a small Avaya SBC this week. I was sent a Dell 3240 system for this job. 

When I tried to power it on I was not able to get it to boot. I did some digging in the product manual and found a chart that showed what different LED sequences meant. I was getting three amber flashes and one white flash which meant that the CMOS battery was dead! Fortunately I keep a few batteries around and I was able to swap it out. The system powered on right away and I was able to load the SBC software.

You would think that would be it - off to the races, ready to go. Unfortunately there was one other problem. I was able to install the software and perform the CLI installation procedure without any hiccups. When I went to connect it to the lab network to perform the web config, though, I found that I was unable to reach the SBC and the SBC Was not able to reach my network. When I checked the interfaces it looked as if M1 was down! Not just that, but I also saw an A2 address that I thought was out of place. The additional network interface was my smoking gun - it was the built-in network interface. I went into the BIOS and disabled it, but that put me in worse shape - the M1 interface was now just missing entirely. I reloaded the software and everything worked out.

Here are some of the things I searched:

  • Avaya SBC network interfaces wrong
  • Avaya Dell 3240 bios
  • M1 interface not responding
  • Avaya SBC MAC Address wrong
  • Avaya SBC M1 Down

Installing the Avaya SBCE on Proxmox

It has been a while since I've posted anything on this blog, and that is an issue. It's not that I've been slacking - I started a new blog about non-telecom stuff, after all. I just haven't had anything exciting to write about in a while.

All of that changed today. I made a decision: I'm going to do something that hasn't been documented before. So I decided to try to get an Avaya SBCE installed in an environment that is not officially supported - Proxmox.

I had to make two attempts. I wasn't able to get the system to boot when I used the qcow2 image that was available from Avaya, so I blew that machine away and created a new VM with no OS.  I'm not going to go into the failed install - I learned from my failures so that you can succeed on your first try.

I chose to do EMS+SBCE for my deployment rather than separate out the servers. I will document the differences that would be necessary to have a standalone EMS. A standalone SBCE has the same configuration.

First, I had to build the VM. In order to determine how to configure it, I looked at the Avaya documentation. I mostly went with the Small SBC because I'm just doing a Proof of Concept, and not a production system. I did opt to go with six network interfaces though. If I were deploying a true production system I would have created one SBC and one EMS. 


In Proxmox, I clicked on Create VM and started to build by virtual machine. On the General tab I selected my Proxmox node and entered the VM name. I accepted the VM ID that was automatically created.

The OS was loaded from an SBCE ISO that I had uploaded to the software library on my server. The OS is Linux, and I selected the 2.6 Kernel.

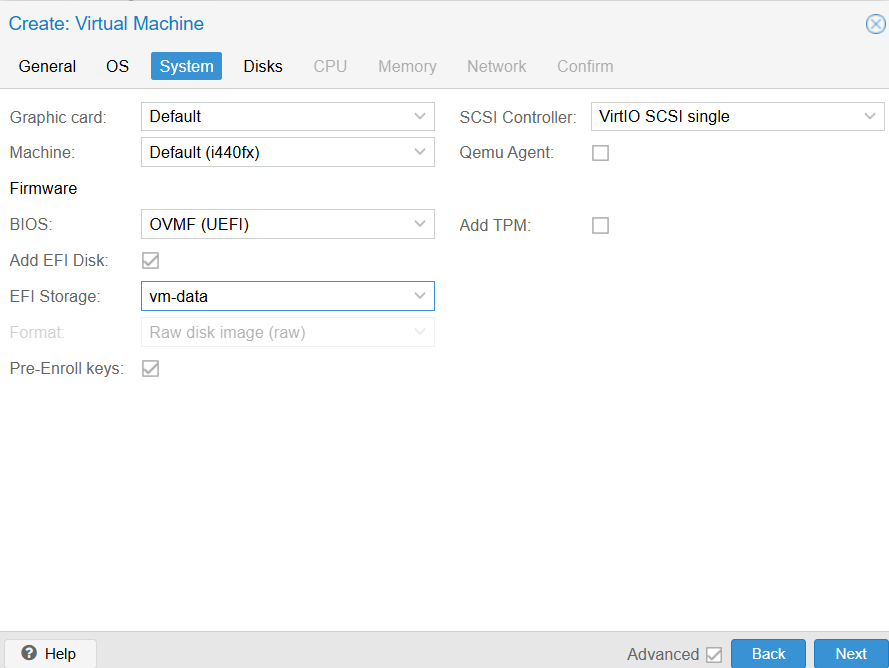
I didnt' make any changes to the graphics card, machine, or SCSI controller. I did ensure that I used a UEFI BIOS. I selected the appropriate storage pool.


I created a single 64GB disk. If I was planning on creating a production system I would consider expanding the disk to 160GB to support additional logs, as the Avaya documentation suggested.

I chose one socket, 2 cores, for a total of 2 cores. If this were a standalone SBC I would have set this to 4 cores. A standalone SBC Requires 3 cores. Proxmox doesn't do CPU reservation like VMWare, so there is a risk here. If I were creating a production system I would enable CPU affinity and lock the SBCE to specific cores. Maybe I'll write something up about that on my tech blog some day.


I gave this the 4GB o RAM that the small size requires. If I were deploying this as a standalone SBC or an EMS I would have set this to 8GB.

You can't configure more than one NIC during the initial setup of a virtual machine in Proxox, so I left the existing interface in place on my default bridge. 


I reviewed the configuration and made sure that I did not have Start after created checked - I need to add the additional network interfaces before I do that. 

I have configured VLAN 11 as my trusted network and VLAN 12 as my untrusted network. VLAN 11 is not able to reach the Internet, and VLAN 12 is only able to reach the Internet. I ran through the installation without knowing what order the interfaces were going to be in, so after I started up the machine I confirmed the interface order. Next time I'll assign the VLANs when I create the interfaces. Of course, it's important to confirm the MAC Addresses after the system comes up.

M1: net0    Management VLAN
M2: net1    Segregated network for HA
A1: net2    Inside network 1
B1: net3    Outside network 1
A2: net4    Inside network 2
B2: net5    Outside network 2


Once the network interfaces were added I started the virtual machine. It took a minute but the Linux installer began. I selected the default option: Install ASBCE with Redhat Enterprise Linux 8.10. In retrospect, I couldn't help but wonder if the proper choice should have been Install ASBCE RHEL8.10 using CDROM. If I do it again I will select the CDROM option. 

The installation script ran and created a bunch of different partitions and installed a lot of packages. After some time the SBC settled down and prompted me to enter Manual Configuration Mode.


I selected Option 1 to configure using Command Line Mode. I was prompted for the basic configuration.

I was prompted for information for the self-signed certificate that the SBC presents.


The time zone selection was next - first a region, then a country, and finally a time zone. 


I did not have a proper NTP server configured, so the system did kick back an error that I didn't capture - it was asking me to set a proper NTP server. I selected Option 3 - to skip NTP.

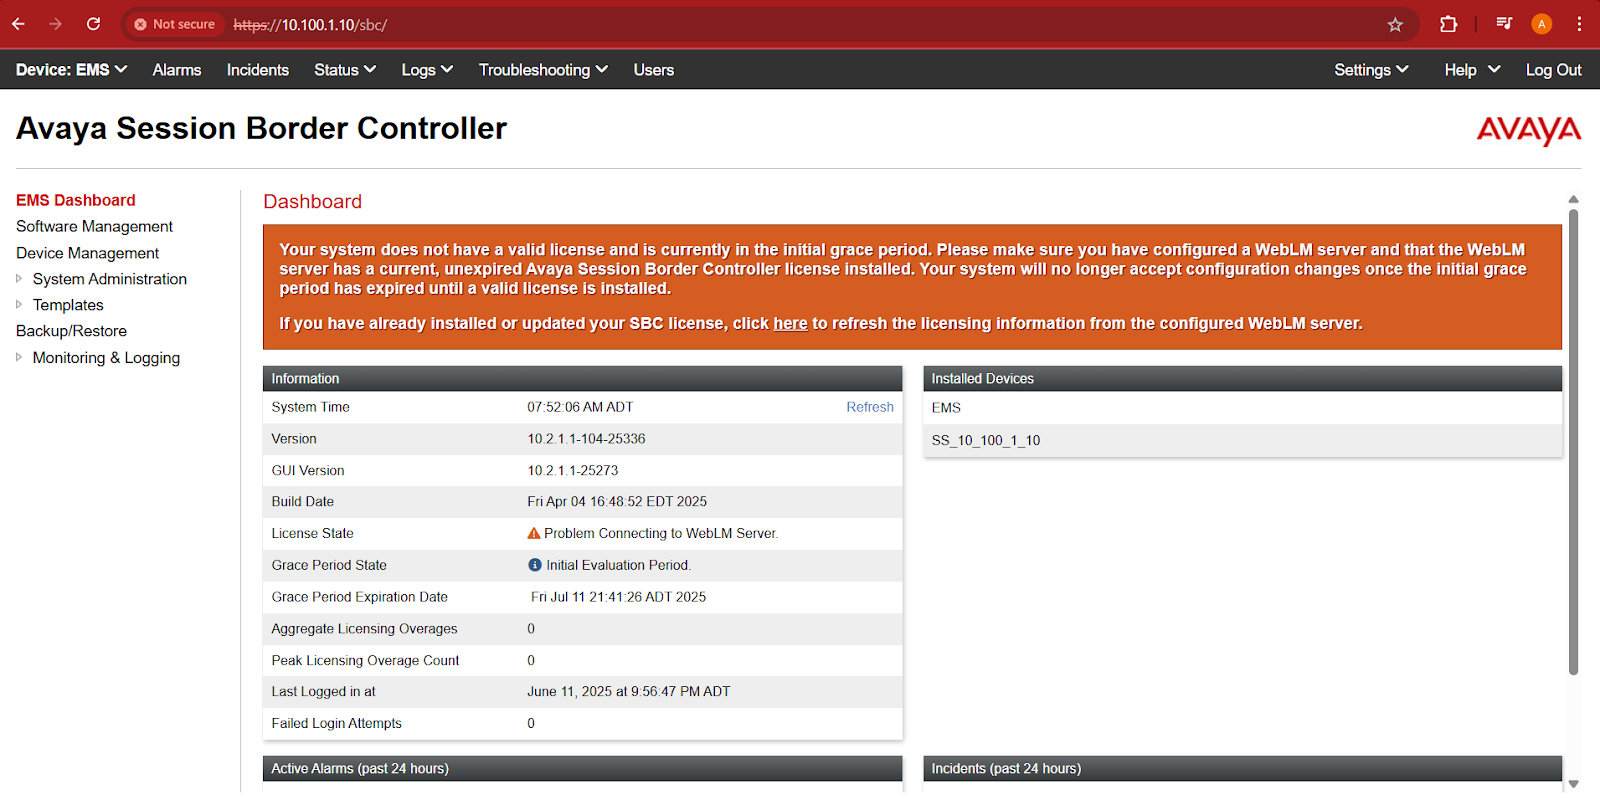
Now I'm able to reach the SBC web interface.
After agreeing to the EULA I am able to log in with the default credentials. I must immediately change the password and am logged out again. After logging in again I am now ready to configure the SBC.


Oh wow, you made it to the end of the post! As a reward, enjoy this link to my tech blog. https://blog.aarondydck.ca/


IP Office BCM CS1000 Integration with NRS

I recently had to network some BCMs, and IP Office 8.1, and a CS1000 together for four-digit dialing. I figure I will share some of my knowledge here. With the release of IP Office 9.0 a Session Manager is required which greatly simplifies the implementation, as long as you know how to route calls using Session Manager.

For the purpose of this article I'm going to assume that everyone knows the basics of how to build a SIP trunk on all three platforms. I will also assume that the appropriate licenses have been purchased and that the BCM is SIP capable.

Let's start with the CS1000. The NRS needs to be configured You will need to create endpoints for the BCMs and IP Offices, as well as any CS1000 locations that you have. The IP Office and BCM endpoints must be configured as static SIP endpoints.Routing entries need to be created for each endpoint to correspond with your dialing plan. It may seem obvious, but you need to build SIP trunks and routes from the CS1000. It is very important to note that the IP Office must be configured in Proxy Mode. The IP Office does not support Redirect Mode. Once you have finished with this you are done with the easy part.

The BCM configuration is also quite easy. Build your SIP trunks on the BCM. Configure your SIP domain and enable RTP keepalives. Calls will be routed on the Private network, so navigate to the Private tab under SIP Trunking. Ensure that your URI map matches the URI Map on your node:


Next you need to configure your routing table. For any BCM or CS1000 endpoint you need to enter the destination digits and direct it to the NRS IP. I also selected MCDN Protocol CSE. Ensure that the port number matches up with what the CS1000 is expecting. For each IP Office configure the destination digits per your dialing plan and use the IP address of the IP Office.

And now on to the fun piece. Configuring the IP Office is the most time consuming part of the whole setup. You need to configure three items: SIP Lines, Incoming Call Routes, and Short Codes.
For your SIP Lines you need a connection to each networked system. For simplicity I chose to use the same incoming call route, however the Line Group ID needs to be different for each site. In my example I used SIP Lines 17-20. All my Incoming Call Groups were 17, however I matched up the Line Group ID with the line number. Since these are IP trunks you can configure them however you like as long as they don't interfere with any other lines in the system. For the SIP line to the CS1000 use the Node IP address. For the BCM SIP Lines use the IP address of each individual BCM. Configure each SIP line with the maximum number of calls equal to the maximum number of SIP Line licenses in the system. This way each site is capable of having the maximum number of VoIP calls, as long as no other licenses are in use.
If you used the same incoming call route for each SIP trunk you only need to create a single incoming call route for IP calls. For the destination use a period (.) to have the call sent to whichever digits are being sent from the far end.
In order to make outgoing calls work you need to create short codes on the system to match the dialing plan. In my case we had four-digit dialing with each site having a unique first digit. This made it easy, I configured a short code for each first digit (i.e. 1XXX, 2XXX, 3XXX, etc.). Each short code was configured as Dial 3K1 using the appropriate line group for the far end site. The BCMs will not understand the standard dial string sent by the IP Office so you need to configure the phone context in the telephone number. In my example I showed the Private/CDP URI as cdp.udp so I needed the following Telephone Number in my short code:
.";phone-context=cdp.udp"

Once all of this is done just go ahead and commit your changes to the IP Office. It will probably require a reboot as you are changing IP information. Once everything comes up go ahead and make your test calls and give the customer a big smile on your way out the door, you're their hero.

As always feel free to comment if you have any questions. I'll always do my best to help!

65 key things to remember for the Avaya SBC Exam


  1. Remote worker cluster using a Real Server IP and Real Server Port will use HTTP and HTTPS for registration requests.
  2. Domain Policy Administration configures Rules, Policies, and Endpoit Policy Groups.
  3. Trunk Server and Call Server Server Flows are administered in SIP Trunking.
  4. Trunk Server and Call Server media interfaces are administered in SIP Trunking.
  5. When integrated with IP Office the SSL VPN connection for SBC remote access is always on unless the connection to the Avaya VPN Gateway is down.
  6. IP address and transport protocols are configured in a Server Profile.
  7. Remote Worker is typically intended for remote users, travelling employees, and remote offices.
  8. Before configuring SIP trunking the SBC must be installed and commissioned.
  9. Topology Hiding Profiles hide source and destination IP addresses.
  10. The Received Interface (as defined in Call Server Flow Administration) is an internal interface that receives inbound traffic.
  11. Server Profiles define the connection and transport parameters from the SBC to the service provider and to the call.
  12. Two routing profiles are required for a SIP trunk.
  13. Before implementing SBC Remote Worker the SBCE + Advanced Feature Set must be installed and commissioned.
  14. Cluster Administration groups endpoints and applies similar attributes to them.
  15. The SBC routing profile defines the next hop for SIP traffic.
  16. A Server Profile applies to the trunk server and the call server.
  17. The Supervisor account has the least system access.
  18. To test the SBC configuration you should make internal-to-external and external-to-internal test calls.
  19. When using an SBC with CM or CS1000 you should use SAL for remote access.
  20. A SIP trunk requires a SIP Service Provider (ISTP), an SBC, and a Call Server.
  21. With regards to application of Time of Day policies the packet is examined first, then the time of day is evaluated, after which the flow is determined and finally the policy is applied.
  22. Best practice for SBC Remote Worker configuration is to fully encrypt both media and signalling.
  23. Topology Hiding can be used to change SIP message parameters.
  24. Media Interfaces define the IP addresses and ports for media.
  25. To administer a signalling interface you must first add the signalling interface, then assign IP addresses and ports.
  26. Session Manager can function as the Personal Profile Manager for a Remote Worker cluster.
  27. Domain Policy Administration is where you would implement time of day restrictions.
  28. Trunk Server and Call Server Signalling Interfaces are administered in SIP Trunking.
  29. The Admin user has the highest privilege level to administer the SBC.
  30. To verify a standalone installation you can log in to the SBCE GUI or log in the the SBC CLI.
  31. Four networks and subnets are required to commission the SBC and SIP Trunking on an SBC located in a DMZ.
  32. The Standalone SBC Software is the same as the SBC+EMS software.
  33. A Standalone SBC requires the EMS+UC-Sec installation type.
  34. HA Configurations always require a standalone EMS.
  35. A Network Assessment is the only way to highlight a problem with inadequate bandwidth on the customer's network.
  36. All SBC and EMS elements require Network Passphrase Authentication in a High Availability configuration.
  37. HA installations are done using the installation type UC-Sec.
  38. The EMS should be configured on M1 in a co-res (standalone) configuration.
  39. A Site Survey will provide information on customer readiness.
  40. In the EMS GUI you can identify the standby SBC by the SBC name.
  41. The SBC is shipped with a serial cable or an RJ-45 to Serial cable to connect to the console port on the SBC for initial software installation.
  42. In an HA SBC the M2 interfaces carry heartbeat information.
  43. The SBC uses SSH port 222 for CLI access (Not port 22).
  44. An SBC alarm will be triggered by System Level failures.
  45. The SBC has a utility called Call Trace to monitor a single telephone.
  46. The SBC Call Trace shows signalling level information for a specific URI (phone).
  47. SBC incidents indicate a problem with the SBC software.
  48. SBC Call Trace information can be viewed in the SBC GUI under Diagnostics\Protocol Tab.
  49. A manually created backup can be called snapshot.zip.
  50. You can look at System Incidents to find details of SBC operational problems.
  51. SBC Alarm Descriptions can be found in the  Appendices of Administration Guide of the SBC documentation.
  52. The Link status/activity LEDs, hard drive LEDs, and over-temperature LEDs can give you a visual alert of a problem with the SBC.
  53. SBC backups can be stored both locally and remotely.
  54. You can view SBC System Alarms in the SBC GUI.
  55. An SBC will show up as Ophaned in the EMS if there is a mismatch between the SBC and EMS software levels.
  56. When upgrading an HA system you first upgrade the EMS, then the backup SBC, then the primary SBC.
  57. Denial of Service (DoS) is an availability attack.
  58. The DMZ is a neutral demarcation point between the trusted and untrusted network in which the SBC can be deployed.
  59. A High Availability SBC will require a standalone SBC.
  60. The SBC can be deployed inside the enterprise core or in a DMZ.
  61. Advanced Services adds the Mobile Workspace (AKA Remote Worker) functionality.
  62. Eavesdropping is an example of a confidentiality attack.
  63. An SBC provides secure enterprise communications.
  64. Signalling Manipulation is using the SIP Trunk Integration Module scripting language.
  65. Signalling manipulation can modify the domain part of the SIP packet.